Hello from 2023!
This is my latest project of converting a blender project to an optimized web project - from grass, to particle simulations to sourcing trees from cg trader. Im going to walk through this showcase
Below are a couple of versions of this project.
And here is the final link.
Modelling Geometry
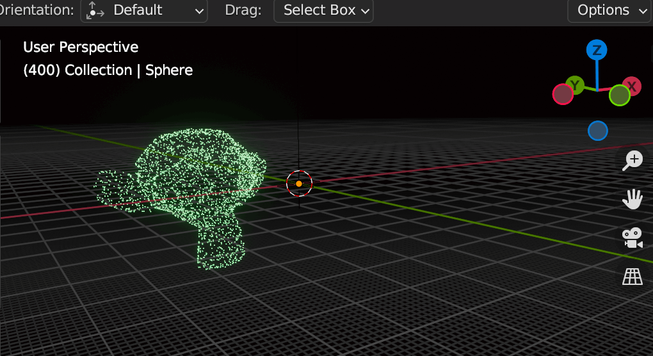
This model consists of two main parts a rough decimated layer and a inflated and scaled UV sphere.
This is a great tutorial on how to create a rocky like exterior to a mesh, you can either use the addon or follow the tutorial to get the same effect i have on my outer sphere. Create what basic shape you want and then apply the effect or create it via the modifiers.
Once we have the rocky layer, the premise would be to use the sculpting tools - in particular the inflation tool, with low detail - to inflate parts of the flatter inner sphere over the top of the rocky sphere.

The trick here is to inflate the parts between the main rocky slabs, this way it looks more natural having the soil mesh areas overlay the rocky areas mesh.
Very importantly if we want to have this optimized for the web as best we can the we want low detail on dynotoplogy while using the inflate tool, this way we can still shape the soil mesh overlay in such a way that it can be shaped but doesn’t add 30k vertices, which would be a bit of a waste of performance on the web. One setting to make sure you have relatively high is the number of undo’s in blenders system settings in preferences. I find myself more times than I can count going back and reverting things so I can try again.
Grass
Grass is very hard to optimize for the web, it can involve many many vertices, or 10’s of thousands of instances.

The way I chose to do this and which I find gives the best results is alpha clipping a 2D grass tuft, here is one I found on the web for free.

We consume this in the shader and use the discard key word for removing the parts with opacity less than 0.1. This way the grass actually looks like a 2d grass tuft. We then apply the positions json to update the instances matrix, which will store rotation and position in.

The rotations is the key bit here. We want to rotate it in such a way that we don’t get lines as we pan round the grass. This looks super bad and fake.
The best bit is we provide fake positions to the instances to begin with and then use the instance matrix to transform the original position / rotation, or offset the original position and rotation to each instances position.
There are ways to improve this, by storing data in images and using an index value to generate some uvs to access the pixels in the image, this way we by pass KB/MB’s of json storing positional data, instead we can have like a 100kb image, which potentially could use some sort of image optimization with minimal signal lose.
Trees

The trees came from cgtrader. The tree pack is a low poly and can be found here.
My thoughts on this is I am trying to do a POC, my time is valuable and I don’t want to get bogged down in creating 6-10 variations of low poly trees and then UV editing + shading / baking textures.
They are very good quality low poly trees and came with materials.
This way I can focus on the important aspects like making the lighting good and tweaking effects like the fireflies.
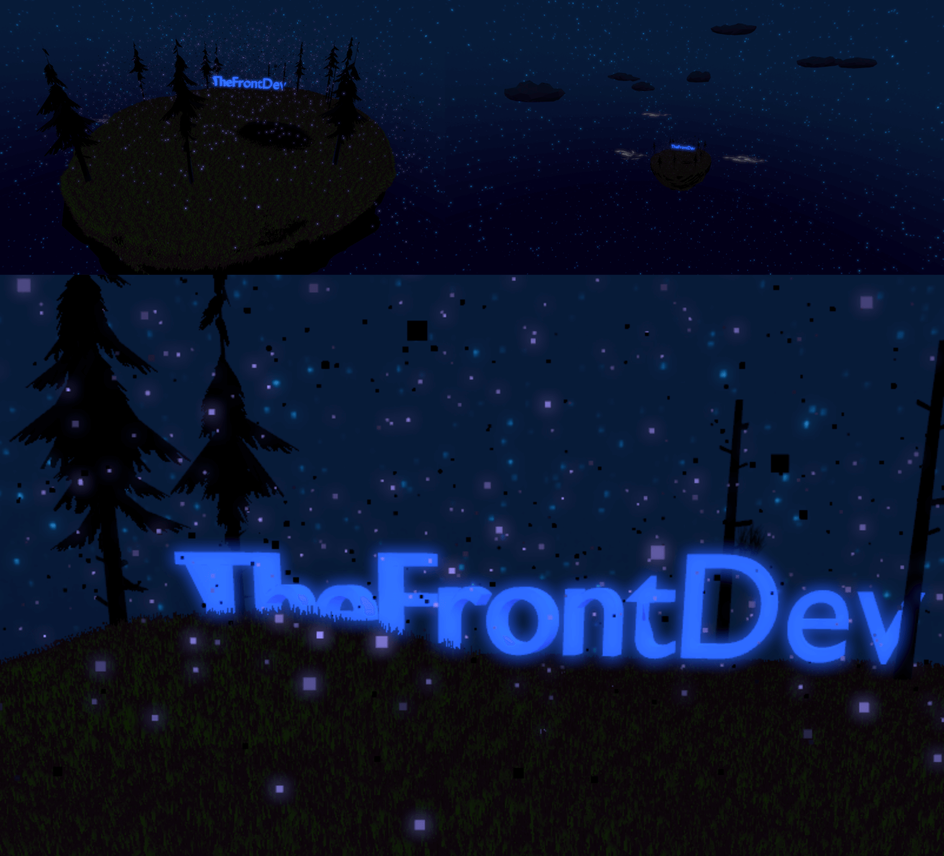
World Background and HDRI
The best thing which will make your 3D scenes look professional is HDRI maker and the results you can get with rendering a world background as a HDRI.
The HDRI will emit light onto the scene and will become probably the most important part of your environment, setting the mood and allowing you to create atmosphere.
You can follow any tutorials you like or mess around with layered noise to gets stars or anything.. and then essentially bake or render it to hdri 2/4k (usually best for the web - depending on if it has detail of just gradient block colors).
Then its as simple as loading it in using @react-three/drei’s environment component. You can make this look so so slick on your personal projects.


One small thing to note is that the environment intensity will need to be tweaked as again I found there isn’t a 121 relationship, it comes close but not exact. Which is to be expected considering blender and threejs/R3F are two completely separate render engines.
Clouds
In the same regards for the trees I chose some low poly clouds which looked good and came with materials.
If you don’t have the spare \$, then there are numerous tutorials on generating low poly clouds. Just follow one of those tutorials and create a few variations of clouds.
Hosting
For hosting I have just put it on netlify as I don’t get high traffic and even if I did I could by more time from netlify.
The key thing here is to get the website behind cloudflare as we can get really good caching then!
This way we can save on the bandwidth for netlify. Again I wont go into too much detail but there will be some infra, but all pretty standard / basic.
And a point for the future I am going to put this on a custom domain, as it always feels more professional if you do this.
Shading
One thing that will become abundantly clear as you make complex textures/ patterns, is that the shader graphs don’t export to the GLTF format, and even if it did there would be no end of trouble for the versioning and how blender implements the graph in its own flavour of code and not a 121 with GLSL.
So how can we over come this? Baking. We can use cycles and bake a texture to a set of UV coordinates. So we need relatively clean topology.
It is no good to make a really complex shape with many over lapping random vertices, the mesh of vertices needs to be as clean as possible or in other words have clean topology for uv unwrapping.
UV unwrapping is the task of mapping a 3D mesh to a 2D plane of coordinates, such that every 3D vertex is placed on this 2D coordinate plane. This way we can store the color of each 3D vertex onto the texture at certain 2D coordinates, which represent a 3D spacial coordinate.
Here is an example, it is the base mesh uvs highlighted:

And here is the albedo or color of the mesh stored in the texture:

As you can see the albedo is stored within the plane shape on the UV map.
So again, I wont go into lots of detail on clean topology in blender as theres many tutorials which will describe it better than me.
Once we have clean topology, a set of UVS and the cycles render engine enabled. We can select a image node (disconnected from anything) and the mesh in question and we can bake diffuse, or emit or combined.
Three small points to make: you cannot bake alpha directly, emit tends to be limited to strength 1 afaik and finally the lighting in the scene can drastically affect the diffuse albedo/color of the objects when baked (sounds obvious this last point but has caught me out sometimes).
Baking is where we essentially hardcode the colors for a mesh into a texture to be loaded into the 3D environment when we load the model.
You should be aware that if you bake to an 8k image, if this project is designed for the web then you will still have to download this massive image, so its always balancing the good looks of higher res images/textures with the performance tradeoffs on the web which goes along with high res images / textures. Be prepared to try multiple times to get the best looking baked textures.
Fire flies
The fire flies were an adaptation of this where by we store the positional data of points in a image from blender, where each pixel represents a positional piece of data about a point. Lucky for us we can use geometry nodes to covert a bounding shape into a volume, distribute points or instances inside the volume and then run the script in the article above to get the positional image.
We can read this or texture sample this and convert back to positions.
Now we have a quick and easy way to do this we can now concentrate on adding movement and the way it looks ie the bloom below.
The movement is influenced by noise and gl_PointSize also oscillates, which means the size of the points will change which helps create a realistic firefly effect.
Postprocessing and bloom
The postprocessing and bloom is what gives the glowing effect for the 3D text and fireflies. With postprocessing things can get really complicated really quickly. However with some experience I can now try and mitigate the complexities.
Instead of doing some really complicated I lowered the luminesce or brightness threshold in the @react-three/postprocessing library’s bloom effect. Then increase the vec3() components (x/y/z) for the fireflies points and increase the emission of the text. This was we increase the brightness of these 3D objects and enter above the threshold and there bloom is applied.
This takes a lot of tweaking and for me lights are by far the hardest thing to get right.

The transfer of lights from blender to three/r3f is a 100% not 121. So you will have to do some tweaking of the lights, positions and intensities. This includes playing around with the environment map intensity as well.
Final Thoughts
You might be asking yourself why would I tell everyone how to do immersive 3D environments, surely this will detract from my opportunities or future prospects.
The only answer i have to this is.. by helping people stream line workflows and drastically reduce time to ship products, I can effectively help my own prospects. The more companies which do this sort of thing the more need for people like me there will be and potentially in the future I can do more of what I love :)
Plus I really like to help people into 3D, this is something I have a deep passion for and anyone who asks for help will receive it (when time permits obvs haha) [email protected]
Hopefully this article was useful and sparked your interest!
Everything I have done on this project was demonstrated in pioneering open source workflows for 3D, blender and three/r3f.
I will hopefully open-source the repository under some sort of license in the near future but for now it needs tidying up and perfecting.
Let me know if you have any issues or improvements for this project via linkedin or email.
For now goodbye!